Day 27: Make a Ice Cream Cake with Wildflowers and Whimsy
Hi! I'm April from Wildflowers & Whimsy! I am so excited to be here today!
I am a wife and mommy to two sweet little boys and one very outspoken little girl...all 4 years and under. My blog is all about my sewing and crafting projects with some of my attempts at photography (here and here and more here) and even a little modeling (lol! like here and here) thrown in. I love being inspired to push myself outside of my comfort zone by all of the amazingly talented women out in blogland, and I have recently started sharing my free sewing patterns. I would love for you to stop by and say hi!
Today I want to share with you one of my family's absolute favorite recipes. It's perfect for summer, but the even ask me to make it in the middle of winter!
{Homemade Ice Cream Cake}

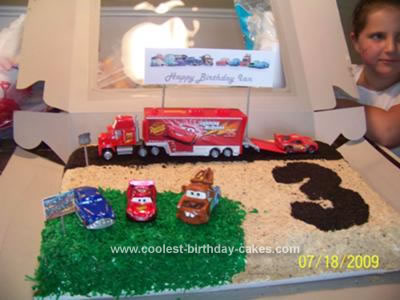
I made this cake for my son, Ian's 3rd birthday.
I got most of the decorating ideas on Coolest Homemade Cakes. And I submitted it to the site after Ian's party.
Go check it out they have some really amazing ideas!
You can find my cake here.
Here's how I made it. Let me know if you have any questions.
Ingredients
1 box dark chocolate cake mix
2-.5 gallons vanilla ice cream
lg jar hot fudge topping
2 lg containers of cool whip
2 boxes of chocolate pudding (4 serving)
oreos
Line the pan with foil and bake the cake following the instructions on the box in a Wilton 12" x 18" cake pan (if you are using a regular 9 x 13" pan, just use half the batter) for roughly 32 mins @ 325. Once it is cooled, put it in the freezer and the ice cream in the fridge to soften. It takes about 30 minutes. Once the ice cream is softened, spread it on top of the cake and put it back in the freezer to harden. In the meantime, mix together one large contatiner of whipped cream and the hot fudge topping. Then, blend in the two boxes of chocolate pudding until well mix. Next, fold in about 16 crushed up oreo cookies. I found the recipe for this layer here but changed the proportions a bit. Add this to the top of the cake pan, and allow to harden for at least four hours.
Once, it is hardened, turn the cake over onto a cake board, peal the foil off, and ice with the reamaining container of cool whip.
To Decorate
Once, it is hardened, turn the cake over onto a cake board, peal the foil off, and ice with the reamaining container of cool whip.
To Decorate
After I iced the cake with whipped cream, I let the cool whip harden a bit. Then, I used crushed up vanilla wafers for the sand, with a few chocolate teddy grahams thrown in to give it some color variation and make it look like real sand.
I printed a giant "3", cut it out and used it as a stencil for the number on the cake and a strip of cardstock as a stencil for the road. Once the cake was covered with "sand", I removed the stencils and used crushed oreos to fill in the road and the number "3". I dyed grated coconut green by tossing it in a ziploc bag with green food coloring and filled in the blank corner.
I then printed signs on cardstock off the computer and used Ian's toy cars to decorate. He loved it and I had a great time doing it. The frozen coconut was a surprise hit with the kids. They loved it. I hope you try this cake. It is seriously amazing! ♥
Thanks so much Aimee for having me!
Thanks so much Aimee for having me!


Great job April! I love it! I will have to try this. thanks for sharing.
ReplyDeleteHow fun--my girls would LOVE one of these this summer! ;)
ReplyDelete